Pages

Sunday, December 19, 2010

Openwrt in VMware

I'm doing my final year project in network security. For that I have to create a virtual network to work with. I have chosen VMware. And for router firmware I decided OpenWRT, a GNU/Linux based firmware for devices like gateways.

But When I tried to run OpenWRT in VMware, I found a big problem. Actually OpenWRT comes in the format of raw image (.image). It can't be directly installed directly in VMware. So I need to find alternatives. But I'm new to both VMware and also OpenWRT. So I'm stuck first. After I read so many forums, I got some idea. But no method given in those forums worked. Each and every one has come with its own fault. So I started doing myself things. Finally I got it. I just do the following...

  • Install VMware
  • Download Openwrt 
  • Install qemu, commend line virtual emulator. Here It will be used to convert the raw image into vmdk image.
  • now convert the raw image into vmdk format by issuing the following commend
    qemu-img convert -f raw <source_file_name> -O vmdk <desitination_file_name>
  • For example, If you have downloaded openwrt-x86-ext2.image, run the following commend in terminal. 
    qemu-img convert -f raw openwrt-x86-ext2.image -O vmdk openwrt-x86-ex2.vmdk
  • Now start VMware. 
  • Create a new virtual machine. In the first dialogue, select custom installation
  • In the next dialogue, select other linux, and select memory, network adaptor, and other things as you like. 
  • And finally It will ask for the hard disk. Then select "use existing hard disk" and browse it towards the vmdk file created previously.
  • Give finish. Your work is over. Now run OpenWRT from VMware.      
  • Its default IP address is 192.168.1.1. So use this IP address to connect  the firmware.

Saturday, December 18, 2010

ubuntu 10.10

After a short period I'm returning back here. Actually I was busy about my exams and followed by my campus interviews. Now got some time. But even now I'm busy with my project. But whatever I'm here now to say I'm enjoying Ubuntu 10.10 and try to make you people happy.

A month before I downloaded it. I was somewhat away from Ubuntu after its April 09 release as I become stick with Windows 7. And another problem is that after 9.04, Ubuntu's releases never support my wireless adaptor. But now I bought my new USB modem (tata photon+). So now I came back to Ubuntu. Actually I have installed both Windows 7 and Ubuntu 10.10in my computer.

Still it doesn't support my wireless adaptor but it supports my modem. Actually this is an added feature from its early version. In Ubuntu 10.04 there is no inbuilt configuration for tata photon. We have to do it manually. But now its become easy. Just select and go. Everything becomes easy.

As like its other versions it comes with Firefox as default browser. Its fair enough for an end user like me as well as developers like Cibin. And for email client, it still depends on Evolution mail. I wonder why it doesn't go for Thunder bird. Actually I don't like Evolution. But I don't know the reason may be it is unable to delete an account once created in GUI. Also its task management is not so well. So I installed tasque for me.

Instant messaging is done here by Empathy. It works fine. I'm using it for my Gmail and Facebook chat (Please social engineering guys, don't use this information to hack me). But to login Facebook, you have to create your username for facebook. You can create your username here. With this you can login into you facebook account through Empathy.

As usual it comes with the Open office bundle and a dictionary. But that dictionary will work only while you are connected to Internet. One important thing, if you are not connected with Internet, I won't recommend Ubuntu for you. Because, it will have only things which are purely open source. So you are not even able hear you favourite songs in mp3 format. And the accessories, sound & videos, games are same. Graphics is included with Shotwell photo manager. But still I don't work with it. So don't ask anything about it.

One special thing has to be underlined is all who installed Ubuntu 10.10 are give a free Ubuntu one account. With this account you can store your files online. You can synchronise you folder with online. Upto 2GB space is freely available. For premium accounts, additional space will be provided. 

And finally a screen shot of my desktop,

Tuesday, December 7, 2010

Email spoofing 2

In the last post we have seen about mail spoofing using SMTP server. But the problem is, many email providers won't allow mails coming from untrusted IP address. In this method we are going to hire a trusted IP to send spoofed mail.

There are a number of web hosting servers available online and they have mail sever installed in them. The IP of these servers will be trusted by any mail providers. And many of the web hosting severs are available for free. So simply use them to send your spoofed mail. 

There is a function mail() in php to send mail through mail server. We are going to use that function to send our mail. I have already written the code and uploaded it in 4shared website. There are two files. One is a html form that will ask you for the information about the mail. And the second is the php file, that is going to sent the mail. So register for a web hosting having mail server. And upload the files, can be downladed from this link. Now open the mail.html page. Send your mail.

For example, consider as you are registering at x10hosting.com. And you choose the sub domain name as ihacked, then your website will be ihacked.x10hosting.com. Now login in the cpanel of your site and upload the file can be downloaded from the above link. Now open ihacked.x10hosting/mail.html. There will be form appear  asking for the mail details. Just fill the form and have fun.

You can test this in the page I have created. Find the page at here.You can send anonymous from that page. Please don't misuse it. Just have fun ;-P.

Monday, December 6, 2010

Email spoofing 1

E-mail spoofing is nothing but sending mail anonymous. Also you can send mail as coming from some one else  email. This is very old method. This is not a hack actually. When e-mail was introduced, people sent email only by this method. 

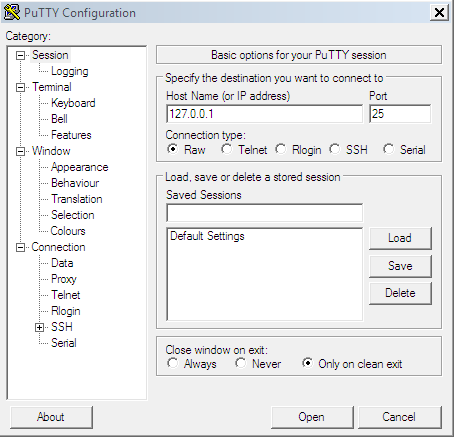
For this you need a SMTP server (Simple Mail Transfer Protocol). You can use any SMTP server. You can download one here. And install it in your machine. Actually a SMTP server will run in the port 25. That is the default port for any mail server.

After installing it, connect it via telnet in command prompt using the command "telnet 127.0.0.1 25". Here the IP address refers your own machine. If you type 127.0.0.1 IP from any machine, it will refer only the machine itself. And the 25 is port number. But most of the times Windows don't allow telnet. So it may automatically close. In this situation, use some telnet client. You can download one here. Its a free utility and also portable, so it doesn't need any installation. 
Run it. Fill the required field and open the connection with the SMTP server. And use the following commands in the order to send mail.

helo /any name/

This is just introducing you to the SMTP server. Here you can use any name. It won't affect the mail you are going send. It is just saying hello to the server.

mail from:/from address/

This is the from address of the mail. You can use any mail address. That will appear as the from address of the mail. There should be no space between the colon (:) and the from address.

rcpt to:/to address/

This is the receiver address. The mail will be delivered only to this address. Here also no space between colon and the to address. 

data

This is the data portion of the mail. You can add any number of header required in this part. All the headers will be in the format /header name/:/header value/. Also no space between the colon and the values. Each header should be typed in a separate line. After adding all the headers, give two line break (type enter for two times). Now type the message. After finishing the mail type ctrl and dot then again ctrl ( ctrl.ctrl ) to represent the end of the mail. The mail will be sent to the receptant address. Type exit to close the program.

eg:
  • helo hacker
  • mail from:billg@microsoft.com
  • rcpt to:kumaran.4353@gmail.com
  • data
    • sub:please help me
    • Mr.Balakumaran, Microsoft corporation is hacked by some hackers and all the control is now with them. Here we can't do anything. So please help our corporation to get out of the hand of those hackers. /ctrl/./ctrl/
  • exit

But the problem with this method, is nowadays many standard mail providers like Gmail are not accepting mails from all IP addresses. So most of the times your mail won't be sent. Also if sent, probably it will be saved in spam. So read the next post to overcome these problems.

Windows backdoor hack

You know to hack Windows. But this is a time consuming process. If you need to crack the same machine often, you better set a backdoor in the machine. A backdoor is nothing but an alternate way to enter. Read more about backdoor.

First know the concept. In Windows there is an option known as sticky key. That is for physically challenged people. It extends the life time of shift, ctrl, alt keys. To enable this, click shift key for five times. The program that is responsible for this is sethc.exe. The location of the file is "c:\windows\system32\sethc.exe". The specialty of this program is you can run this even before you login the machine. Thus if you click shift key for five times at the login screen, sethc.exe program will run.


If you able to run cmd.exe before logging in, you can change the password with "net user" command. So do the following.
  • Copy cmd.exe from "c:\windows\system32\cmd.exe" to Desktop
  • Rename the file to sethc.exe
  • Now replace the original file with the name replaced cmd.exe file.
  • Its over.
Now reboot the Windows machine. When the login screen appears, press shift for five times. Oh ****! the command prompt will appear. Hack the password with "net user administrator" command.


windows password hack 4

This is the attack that have 100% success rate. It is very simple. You know that the SAM file is the file containing password hashes. So simply replace that file with a password known SAM file. Attack over. But you can do this only with another OS. To do this,
  • Boot the password known Windows machine with any Linux live CD, or your bootable USB.
  • Make a copy of the SAM file.
  • Now boot the machine that to be cracked with any Linux as live. 
  • Replace the SAM file with the file already copied.
  • Thats all. The machine is HACKED!
But usually I replace the entire config folder not only the SAM file. Thus the username also will be changed. Because the folder config manages all the user related information.

Windows password hack 3

In this third method you need a software named Ophcrack. There are many software available for cracking windows password. But I always prefer this one. Because it never ask you to do anything. It will simply give the password in your hand.

Ophcrack is a freely available opensource software. You can download it here. The software itself is very small one. But it needs some dictionary to crack. Those will be more weight. These dictionaries are the heart of this attack. They have a table consisting all permutations of all keyboard characters and their corresponding hashes. Actually these hashes will be compared with the password hash present in the SAM file. If a match found, the equallent word will be returned. This is known as dictionary attack.

To crack any Windows password, 

  • Download Ophcrack as an ISO file. Download it here.
  • Now write it in a CD or make your USB drive bootable with Ophcrack. Know how to make a USB bootable here
  • And boot the Windows machine with Ophcrack.
  • Wait till boot complete. You will have the password in minutes.
But the problem here is, your attack is limited with the dictionary you use. The dictionaries that are permutation of alphabet are free to download. But those consisting special character are not free. And also you have to download them. Read next post for a better hack.

Wednesday, December 1, 2010

Windows password hack 2

In our last post we have seen about the SAM file, which contains the password hash. In this post we are going to see about some simple steps to hack the password.

Consider you are in the position that you can access the administrator account but you don't know the password. Like in your college library where the system admin will type the password for you or you are checking mails at your friend's computer. You have accessed the admin account. You want to change the password. But you don't know the password. You have two ways.

First one is, create a new admin account and choose your desired password for it. Now logout from the current administrator account and login with the new administrator account created by you. From this account, you can delete the other account where you have logged in before. Also you can have a backup of the files belongs to the deleted administrator.

The second way is without knowing the password of the current account, changing it using command prompt. This can be performed only with administrator privilege. For this do the following steps.

  1. Open command prompt by typing cmd in run. In Windows Vista and Windows 7, open it as administrator ( in start type cmd. it will appear. now right click it and give open as administrator ).
  2. Type the command " net user \user name\ * " without cots. replace \user name\ with the username of the current account.
  3. Now it will ask for new password. Type new password. Your typing won't appear in the screen. Type enter.
  4. Retype the password. and click enter.
  5. Now the password will be changed.